Reminder: you must run a full session before setting up your pic-pic sharing station. Otherwise your event date folder will not exist and there will also be no photo files to share.

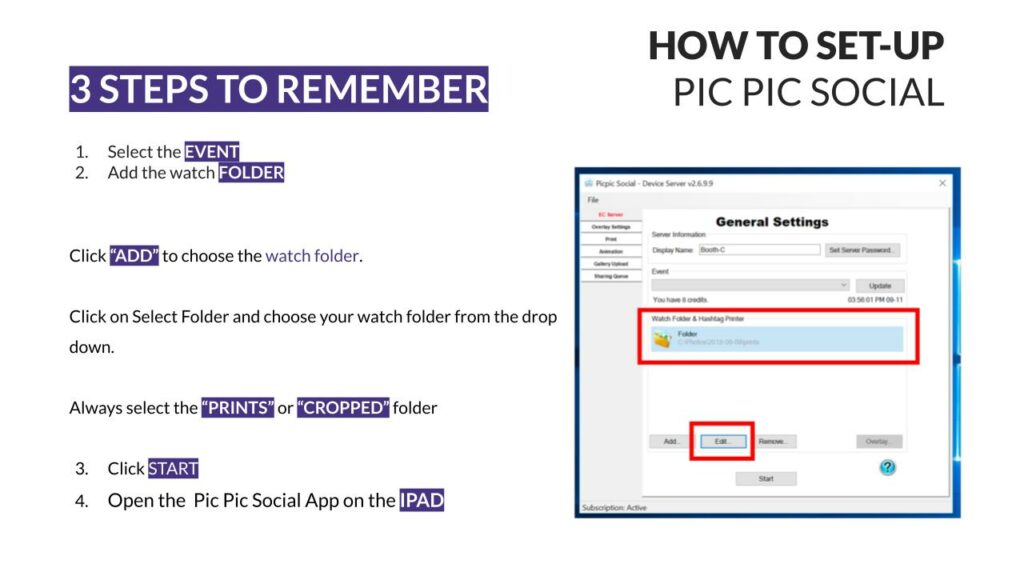
Open the PicPicSocial Device Server on the PC.
Hit “update” and select the event your are working in the drop down.
The next step is to add a Watch Folder on the Device Server. The folder you select will be monitored for new files. When you save files to the Watch Folder chosen, they will display on the Sharing Station to be viewed and shared by guests.
Click the Add button, select the Folder option to select a local folder, and click the Next button.
Click the Select Folder button to choose your photo booth PC’s output folder you would like to use. Ensure that the folder selected already has images or video files inside it. Click OK once complete.
Please ensure that your iPad is on the same WiFi network as your Device Server. You will not establish a connection if both devices are not on the same network.
It is a requirement that you use a personal hotspot for events to avoid internet and network issues. Using a venue-provided network will introduce connection problems.
Open the PicPic Social – Sharing Station app on your iPad.
If both devices are on the same WiFi network, you should see the server’s (your photo booth PC) display name appear on the iPad sharing station.
Click the name assigned to your desired server and enter the Server Password.
IMPORTANT NOTE: Your Server Password is not your PicPic Social account password. After successfully logging in and configuring the PicPic Social Device Server application, this is the password you entered by pressing the Set Server Password button. (Default its 3757)
After entering your server password, the sharing station will connect with your Device Server. Any images currently in the watch folder will display on the iPad to be shared!